Timetable Tutorial 1 – Enter and exit
Timetables represent one of the most complex aspects of the railway simulator so hopefully by working through these examples the way in which timetables work will become clearer. For more detailed information the manual should be consulted. The associated railway files are available from the ‘Downloads’ section and should be saved in your ‘Railways’ folder. Also available are completed timetable files, but it is suggested that the timetables be created manually rather than just using them from the files because this is likely to give a much better feel for how the timetable editor is used. If you encounter problems that you are unable to solve then comparison with the saved timetables should help as a last resort.
Be aware that when error messages are given during attempts to validate the timetable they can often be difficult to interpret. This is because an error in the timetable will cause a problem that the validator can’t resolve, and the message given relates to the problem seen by the validator (because that’s all that it sees), and that may well not clearly identify the error that caused it. Therefore when an error message is given it tells you that there is an error present, but the message itself should be regarded as a hint as to what the error may be, and the service reference given tells you that it involves either that service directly or one that is linked to it.
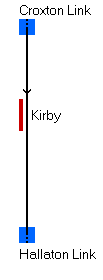
A moving train enters the railway at Croxton Link at 06:00, travelling at a constant speed of 120km/h and leaves at Hallaton Link at 06:01.
Service data is as follows:- Headcode: 1A20, description: Croxton to Hallaton, startings peed: 120km/h, maximum speed: 120km/h, mass: 250 tonnes, braking force: 25 tonnes, power: 2500kW.
note: In the tables text in italics represents buttons to click, keys to press, or text to type into the timetable editor.

| Open railway.exe and Click |
Start the program and load the first railway |
| Click |
This brings up the timetable screen |
| Click |
|
| Type 06:00 then Click |
This is the timetable start time |
| Click |
|
| Type *Train 1A20 enters at 06:00 and leaves at 06:01 at constant speed of 120km/h then Click |
This is a comment and will be ignored by the timetable. Comments must begin with an asterisk and can be placed anywhere in the timetable or omitted altogether. |
| Click |
|
| Type 1A20;Croxton to Hallaton;120;120;250;25;2500 then Enter | This is the service data as above, in the same order. Remember to include semicolons between each piece of data and avoid using spaces except in the description. |
| Type 06:00;Snt;3-4 3-5 then Enter | This is the command to create a new train. The creation time is given, followed by code ‘Snt’ (represents ‘start new train’), followed by the track element identifiers (IDs) corresponding to the rear track element (3-4) then a space and then the front track element (3-5).To find element identifiers while compiling the timetable click Save entry, then HIDE to hide the timetable screen, then click Information, Track information, Show, and hover the mouse over the elements required and the IDs will be given. Then click SHOW and the timetable screen will reappear. |
| Type 06:01;Fer;3-17 then Enter | This is the command to exit the railway. The exit time is given, followed by ‘Fer’ (represents ‘Finish exit railway’), and the track element 3 ID(s) of valid exit point(s). Here there is just one valid exit but if there are more then they can all be listed, separated by spaces. |
| Click |
|
| Click |
|
| Name it Crox-Hall 1.ttb then click Save | |
| Click |
This should give the message  .If not the error message should show where the error is – probably something mistyped. .If not the error message should show where the error is – probably something mistyped. |
Note that in order to save typing and avoid typing errors there are code buttons in the editor (labelled ;Snt;, ;Sfs; etc – note that using these buttons also inserts the semicolons) and a dropdown box containing railway locations that can be used as stopping places (providing the railway has been loaded first), and these can be clicked and the relevant text will be inserted at the cursor position. For this railway the only location in the box is Kirby because that is the only location where trains can stop.
Note also that it is advisable to click Save entry periodically while compiling the timetable to avoid loss of a lot of information if the computer goes off for any reason, and it is also necessary before the timetable screen can be hidden to find track element IDs.
Train data can be displayed during operation by clicking Information, then Train information, then Show status, and hovering the mouse over the train. Hovering the mouse over a continuation (entry or exit link) shows the next expected train if there is one.
If the starting speed had been set to zero instead of 120km/h then the train would immediately begin to accelerate and therefore enter slightly later. It would continue to accelerate up to the maximum speed of 120km/h because there are no lower line speed restrictions and no stopping places – try it by editing and resaving the timetable and see how it affects train behaviour.